From Landscape Plants Website
by Edward F. Gilman, Professor, Environmental Horticulture Department,
IFAS, University of Florida
Pruning
Landscape Trees
When
to Prune 1
The
best time to prune live branches may depend on the desired results.
Growth is maximized and defects are easier to see on deciduous trees if
live-branch pruning is done just before growth resumes in early spring.
Pruning when trees are dormant can minimize the risk of pest problems
associated with wounding and allows trees to take advantage of the full
growing season to begin closing and compartmentalizing wounds.
Removal
of dying, diseased, broken, or dead limbs can be accomplished at any
time with little negative effect on the tree. Plant growth can be
reduced if live-branch pruning takes place during or soon after the
initial growth flush. This is when trees have just expended a great
deal of stored energy to produce roots, foliage, and early shoot growth
so pruning at this time is usually not recommended due to the potential
stresses. Stressed trees should not be pruned at this time.
Flowering
can be prevented or enhanced by pruning at the appropriate time of the
year. To retain the most flowers on landscape trees that bloom on
current season’s growth, such as crape-myrtle (Lagerstroemia
spp.) or linden (Tilia
spp.), these trees are pruned in winter, prior
to leaf emergence, or in the summer just after bloom. Plants that bloom
on last season’s wood, such as Prunus,
should be pruned just
after bloom in order to preserve the flower display. Fruit trees can be
pruned during the dormant season to enhance structure and distribute
fruiting wood, and they are pruned after bloom to thin fruit.
Pruning Cuts

Fig. 1 Branch union examples 
Here
are several examples of removing branches from trunks or removing small
branches from larger branches. Always cut just outside the branch
collar.
There are
Four Different Pruning Cut Types
1. Removal cut: large removal cut,
do not make flush cuts
2. Reduction cut
3. Heading cut
4. Removing dead
branches
1. Removal Cut

|

|
 |
Fig.
2
Visible collar |
Fig.
3
No visible collar
|
Fig.
4
No collar and included bark |
There
are three possible situations trees present to you when removing
branches.
Fig. 2. Cut
to the edge of the collar when one is visible
Fig. 3.
If
there is no visible collar, begin where the top of the branch makes an
abrupt turn toward the trunk and cut outside an imaginary line drawn
parallel to the trunk
Fig. 4.
Make the final pruning cut at the base
of the actual connection between the branch and trunk when there is
included bark in the union
There is no need to apply paints, wound dressings, or chemical
formulations of any type to the surface of the cut.

|

|
Fig.
5
A
good removal cut |
Fig.
6
A
poor removal cut
|
The correct way to
remove a branch from the
trunk is to cut just outside the edge of the swollen branch collar.
Fig. 5. Cutting
through the collar (right) removes an important decay
defense mechanism called the branch protection zone. This zone is
located inside the collar. This type of cut has been called a removal
cut because it removes a branch from the trunk
Fig. 6. A poor
removal cut called a flush cut removes the branch bark ridge and
results in exposure of a thicker bark section above the cut than the
sides and underneath

|

|
Fig.
7
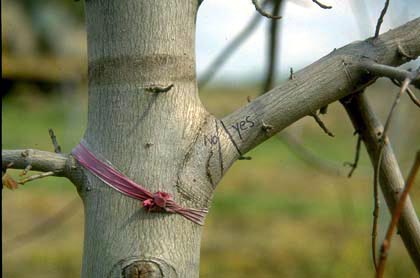
Before
removing a branch
|
Fig.
8
After
removing a branch
|
Fig. 7. Cut along the "yes" line to
remove the branch on the right. This cuts just outside the branch
collar. Cutting through the "no" line cuts through the collar and
removes the branch protection zone
Fig. 8. Removing the branch appropriately leaves the collar intact

|
 |
 |

|
Fig.
9
Good
pruning cut
|
Fig.
10
Flush
cuts are not good for trees
|
Fig.
11
Several
months after flush cut
|
Fig.
12
Good
pruning cuts
|
Fig. 9. Good pruning cuts leave the branch
bark ridge and the collar intact and on the trunk. Note the ridges that
remain on the three cuts in this photo.
Fig. 10. The cut in the
center of the photo removed the collar and the branch bark ridge. This
is referred to as a flush cut. The cut on the bottom was appropriate
and left the collar and branch bark ridge intact.
Fig. 11.
Callus typically begins to form on the sides of a flush cut before it
forms on the top and bottom. The branch bark ridge is missing on top of
the cut. This is a good way to determine when flush cuts are made.
Fig.
12. Good cuts are typically round in cross section as shown above. Note
the branch bark ridge is intact on the sides and top of each union.
2. Reduction Cut
A
reduction cut (also referred to as a drop-crotch cut) shortens a branch
by removing a stem back to a lateral branch that is large enough to
resist extensive dysfunction and decay behind the cut. This is
generally interpreted as cutting back to a lateral branch that is at
least one-third the diameter of the cut stem. Sprouts commonly follow a
reduction cut. In most cases these should not be removed because they
help the retained portion of the branch retard decay. When the branch
that remains is less than about one-third the diameter of the cut stem,
the cut is considered a heading cut. Heading cuts are not considered
appropriate in most instances in the landscape. Heading cuts are
sometimes necessary when attempting to restore trees following storm
damage.

|
 |
 |
 |
Fig.
13
A
reduction cut removes a stem back to a lateral branch. |
Fig.
14
Large
reduction cut
|
Fig.
15
Small
reduction cut
|
Fig.
16
Reduction
cuts in the canopy
|
Fig. 13. A reduction cut removes the stem
back to a living lateral branch that is large enough to assume the
terminal role of the removed portion. This typically is interpreted in
the profession as about 1/3 to 1/2 the size of the removed portion.
Fig.
14. The reduction cut is very useful for structural pruning techniques.
A reduction cut slows growth on the cut stem or branch. There is one
reduction cut in the photo above in the upper part of the large
right-hand stem. This will slow the growth of the right hand stem and
push more growth into the larger stem on the left.
Fig. 15.
Reduction cuts are useful for developing a dominant leader in the
canopy of shade trees. Reduction cut can be seen on the top left stem.
This cut slows growth on that stem which subordinates it to the central
leader.
3. Heading Cut
Fig. 17. A
heading
cut is a type of pruning
cut that prunes a shoot no more than 2 years old back to a bud; cutting
through an older stem back to a lateral branch less than 1/3 the
diameter of the cut stem; or cutting a stem to an indiscriminate
length. Heading cuts on trees typically are not appropriate in the
landscape unless trees are being restored following a storm.
 |
Fig.
17
Heading
cut
|
4. Removing Dead
Branches
To
remove the dead stub cut to the place where the live tissue
begins. The slight swelling on the branch base
about an inch out from the trunk represents the beginning of live
tissue.

|

|
|
Fig.
18
|
Fig.
19
|
Fig.
18. To remove the dead stub cut to the place where the live tissue
begins.
Fig.
19. The slight swelling on the branch base about an inch out from the
trunk represents the beginning of live tissue.
Photo Examples of Pruning ext. link
ROOT PRUNING
TREES 2

Fig. 20
Root pruning landscape or nursery trees can
take many forms. Techniques vary depending on objectives and tree age.
Nurseries routinely root pruned certain species to create dense root
systems. Landscape managers root prune to reset sidewalks and curbs,
and to reduce conflicts with other structures. Contractors root prune
to prepare for building and utility installation. Arborists root prune,
under certain circumstances, to improve tree life span.
Root pruning
guidelines for landscape trees:
1) Container
production practices: roots
2) Root
pruning at planting
3) Removing
(pruning) stem girdling roots
1. Container production
practices:
roots
Roots in containers grow quickly to the container wall, sometimes in a
matter of days or weeks. These sometimes branch, but often deflect
without branching to circle around the container wall and/or descend
down the container wall. Occasionally roots grow up the container
sides. These root defects are the biggest challenge to growing trees in
containers because these can lead to tree health and stability
problems. There are many methods of producing trees in containers, and
there are many container types designed to reduce defects. Combined
with root pruning each time the plant is potted into a larger
container, quality trees can be produced in many container types.
2. Root pruning at planting
New research (2009) is suggesting that slicing root balls does not
result in more roots in landscape soil nor improve tree stability in
the landscape. Instead we think that the entire outer inch of the sides
and bottom of the root ball should be removed.
Conventional wisdom
has been to slice the sides of the container root ball as deeply as
possible to sever circling roots. Also cut kinked and
circling roots that occur on the top of the container (see photos
below). This will reduce likelihood of the tree dying from these severe
root defects later. In most cases there is little or no negative impact
on the tree from this aggressive root cutting, as long as trees are
irrigated. The positives far outweigh the negatives. Remove roots that
are positioned on top of the main flare roots as shown below.
 |
Fig. 21
Expose the roots by removing soil or media
from the top of the root ball. All these circling
and crossing roots should be removed. |
 |
Fig. 22
Begin removing roots that circle and cross
the
top of the root ball. |
 |
Fig. 23
When completed the main flare roots will be
visible as shown above. The pink line was at
the original soil level. |
 |
Fig. 24
These roots should be removed because they
are likely to strangle the trunk. |
 |
Fig. 25
After removing the stem girdling roots the
tree
has a much better chance of thriving in the
landscape. |
3. Removing (pruning) stem girdling
roots
Roots that are not directed away from the
trunk can cause health issues for the tree, and tree death in certain
cases. Look for roots that are circling close to the trunk, roots that
are embedded in the trunk, or those that are crossed over main roots at
the base of the trunk. Roots circling or touching the trunk are often
referred to as stem girdling roots. These can reduce the flow of water,
nutrients, and sugars at this point on the trunk. On some species of
trees, stem girdling roots cause death to the bark above the root.
Treatment: If these are less than about one-third the trunk diameter,
and they can be removed without damaging the trunk, then carefully cut
and remove them (see photos below). This will allow roots and trunk
under the girdling root to develop properly. Some arborists have
removed larger girdling roots with no adverse affects on the tree.
Trees often respond to removing girdling roots with increased vigor.
 |
Fig. 26
This shows a stem girdling root growing in
mulch placed on the trunk at planting. Keep
mulch pulled back about 12 - 18 inches from
the trunk to prevent this. Note the trunk injury
(extreme left on trunk) caused by the girdling root. |
 |
Fig. 26
After removing the stem girdling root, the
root
system and trunk below this point can expand
normally. Notice the indentation in the trunk
where the root was removed. The root
wrapping the trunk restricted the trunk from
expanding at this point. It is easy to see why
these are not good for trees. |
 |
Fig. 28
This stem girdling root was visible at the
surface without removing soil or mulch.
Carefully cut the root at the point where it
emerges from the trunk and remove as much
of it as possible without damaging the trunk
and other roots. |
Further Reading
Tree Structure Index ext. link
Tree Pruning
Cue Cards
Pruning at Planting pdf
Pruning Young Trees pdf
Pruning
Established Trees pdf
Tree Pruning
Programs
Young Trees pdf
Mature Trees pdf
A Plan for Training Shade Trees pdf
Assessing Hurricane Damaged Trees pdf
Restoring Trees after a Hurricane pdf
Back to
Pruning and
Training Page
|
|
Bibliography
1 Gilman, Edward F. "Pruning Shade Trees
in the Landscape." Environmental
Hort. Dept., UF/IFAS,
Last
modified 22 May 2014, Landscape
Plants, hort.ufl.edu/woody/pruning.shtml.
Accessed 30 May
2014.
2 Gilman, Edward F. "Root Pruning Trees." Environmental Hort. Dept., UF/IFAS, Last
modified 24
Jan. 2020, Landscape
Plants, hort.ufl.edu/woody/root-prune-summary.shtml.
Accessed 22 Mar. 2021.
Photographs
Fig. 1 Gilman, Edward F. "Pruning cut types: Live branch removal." Pruning Shade Trees
in the Landscape, Environmental
Hort. Dept., UF/IFAS, ENH847, Landscape
Plants, hort.ifas.ufl.edu/woody/documents/cuttypes.pdf.
Accessed 30 May
2014.
Fig. 2,3,4,5,6,7,8,9,10,11,12,13,14,15,16,17,18,19
Gilman, Edward F. "Pruning Shade Trees
in the Landscape." Environmental
Hort. Dept., UF/IFAS, Last
modified 22 May 2014, Landscape
Plants,
hort.ufl.edu/woody/pruning.shtml.
Accessed 30 May
2014.
Fig. 20,21,22,23,24,25,26,27,28 Gilman, Edward
F. "Root Pruning Trees." Environmental
Hort. Dept., UF/IFAS, Last modified 24
Jan. 2020, Landscape
Plants, hort.ufl.edu/woody/root-prune-summary.shtml.
Accessed 22 Mar. 2021.
Published 30 May 2014 LR. Last update 22 Mar. 2021 LR
|